
Taking a Class #5; Second Session
I and one other student arrive just at 6:30 pm for the 2nd class session. It looks like the others have been there for up to one hour and they are now busy at work. I stopped by the craft store looking for a better cutting implement, but without success.
The link stretching, pinching, folding, and weaving demonstration begins right away and I affirm to myself that this is a fun class. We will make the single loop-in-loop chain with the 5/16th inch size rings. This is the simplest to make and is also one that looks very open weave. The fine silver rings are fused, stretched, pinched into a bowtie shape, and folded at the bowtie middle. We now have the shape of a tulip flower that hasn’t bloomed yet. Then with some adept manipulation, one is woven into the next and so on. No photos of the single loop-in-loop chain yet, but if you can't wait then click on the first post of this blog to look at the photo of the Loop-in-Loop Ancient Chain book. It is the only silver chain on the front of the book.
The next chain is ‘pinched loop-in-loop’ or the sailor’s chain and uses the larger 7/16” diameter ring. The same manipulation steps are made up to the bowtie pinch, but then two scribes are needed and needle-nose pliers and well it is just too complicated to describe with words. Pictures and video are needed to communicate the technique.
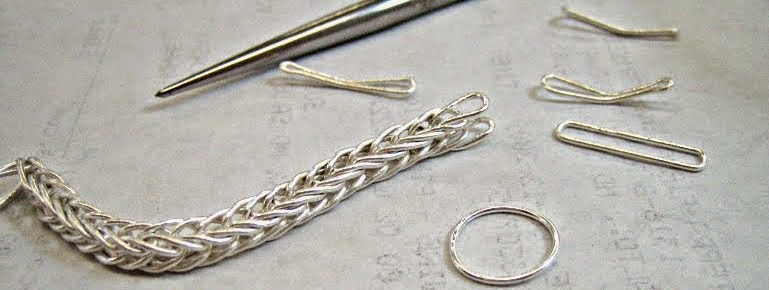
 At this point, all I have to share are photos of components at various stages and of the finished chain. The photo above is 22 gauge fine silver wound over a 7/16" steel mandrel. This is before the rings are cut. The photo to the immediate left shows the tools used and (counterclockwise) components of cut and fused rings, stretched and pinched bowties, folded and double-pinched step shown in upper right of photo. The photo below shows components at all steps including the finished chain.

No comments:
Post a Comment
Comments are welcome