My original intention at the beginning of this blog was to convey the experience of taking a class as an adult. I expected the content of the class to be secondary in importance. As the weeks and writing unfolded, my own interest in the class content naturally increased and it was reflected in the writing. So, my apologies to the reader who was hoping for a step by step explanation or video on how to assemble loop in loop chain. This was not in my original blog plan. However, a video will be in the future plan after the class project is finished because my search of the internet shows a limited amount of available information.
So, I will speak to both the class experience and the content as best as possible. We were in the middle of the short summer semester before realizing it and the weeks were passing quickly. It seems obvious, but it must be stated: it is imperative to keep up with the assignments and not let time slip by. Even if you think you are on top of all the assignments, do a bit more! I swear the time leading up to a deadline accelerates and problems multiply.

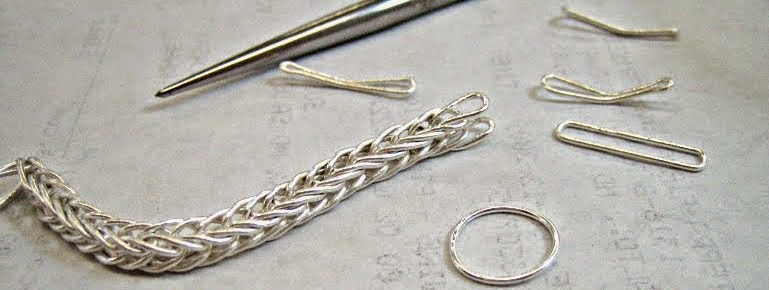
This picture shows a loop-in-loop chain being made. There are many types of loop-in-loop chains. The chain pictured is called a one-way double. ‘One-way’ means the links are all added in one direction and ‘double’ means the new addition link goes through two links in the chain. The fabricated components at different stages are shown in the same photo.
1. The round ring of 20 gauge fine or pure silver is fused to itself by heating with a torch.
2. The ring is then stretched with needle-nose pliers to form the oblong shape.
3. Then the center is closed or pinched with pliers and one end is narrowed to allow insertion into the chain.
4. The center large radius bend is slightly initiated.
5. At this stage, the links will need to be annealed before assembly into the chain.
6. The new link is inserted into the openings of the previous two links when making the ‘double’ chain.
7. After insertion into the chain the new link will be bent with a large radius at the center of the loop.
8. The metal probe or scribe tool is used to open up the added link, especially the narrowed end.
9. Periodically, the chain may be annealed to prevent breakage and keep flexibility.
So, I will speak to both the class experience and the content as best as possible. We were in the middle of the short summer semester before realizing it and the weeks were passing quickly. It seems obvious, but it must be stated: it is imperative to keep up with the assignments and not let time slip by. Even if you think you are on top of all the assignments, do a bit more! I swear the time leading up to a deadline accelerates and problems multiply.
This picture shows a loop-in-loop chain being made. There are many types of loop-in-loop chains. The chain pictured is called a one-way double. ‘One-way’ means the links are all added in one direction and ‘double’ means the new addition link goes through two links in the chain. The fabricated components at different stages are shown in the same photo.
1. The round ring of 20 gauge fine or pure silver is fused to itself by heating with a torch.
2. The ring is then stretched with needle-nose pliers to form the oblong shape.
3. Then the center is closed or pinched with pliers and one end is narrowed to allow insertion into the chain.
4. The center large radius bend is slightly initiated.
5. At this stage, the links will need to be annealed before assembly into the chain.
6. The new link is inserted into the openings of the previous two links when making the ‘double’ chain.
7. After insertion into the chain the new link will be bent with a large radius at the center of the loop.
8. The metal probe or scribe tool is used to open up the added link, especially the narrowed end.
9. Periodically, the chain may be annealed to prevent breakage and keep flexibility.
![Reblog this post [with Zemanta]](http://img.zemanta.com/reblog_e.png?x-id=75b3460c-40d0-4507-92d9-e850ffc45b96)
No comments:
Post a Comment
Comments are welcome