Monday, August 24, 2009

Looking up the word "critique", sub-post #10-B


Discoveries on the internet are a wonderful thing. I like this one so much, you can look for a new additon to the sidebar.


The Visual Thesaurus offers stunning visual displays of the English language. Looking up a word creates an interactive visual map with your word in the center of the display, connected to related words and meanings. click here to learn more about the Visual Thesaurus.


"critique"
NOUNS
critiquea serious examination and judgment of something
"constructive criticism is always appreciated"

critiquean essay or article that gives a critical evaluation (as of a book or play)


VERBS

critiqueappraise critically
"She reviews books for the New York Times"; "Please critique this performance"

Disclosure:  I have no connection or arrangement with the Visual Thesaurus product or Thinkmap, Inc. company.
.visualthesaurus.com
bulary.

© 2009, Thinkmap, inc. All Rights Reserved. Privacy Policy

Loop in Loop Chain Making Class, Post #10


The Final Critique

The grade is usually based not on an exam, but on a critique. Here your work is tuned in or displayed to the instructor and the class. Sometimes, several or all instructors at a school are involved in the final grade determination.

Some classes have more than one critique and you gain some experience in the process. This short summer class had only one final critique. For our loop in loop class, all the jewelry worked on during the class, including samples, is placed on the black table cloth. Each grouping is by one student. The instructor and all the students gather around for the critique. The instructor passes one student’s work around in a tray while the student makes comments. The instructor then makes comments. This photo was taken during a break, while one student is talking to the instructor.

Sunday, August 23, 2009

Computer and Internet Provider Interruptions Post #9


Wow, this blog keeps getting interrupted. I made the writing (and thinking about the topic of writing) a priority second only to the classwork).
However, Verizon, my internet provider, could not provide service for one month and two service calls to my house. The final resolution was to downgrade my speed to a more manageable rate (for them). It wasn’t a speed issue for me. I either had service or I didn’t.

My laptop had been out of synch with the Microsoft mothership for at least a month due to the lack of the internet. So, when I get connected HP, Norton, and Microsoft wanted to update and I happily agreed. I was beside myself tickled pink to be connected. I should have given some thought to all my clicks because one allowed Microsoft to upgrade IE7 to IE8. I later discovered that the cause of the strange lack of editing on Blogger was due in fact to IE8. To make a long story short, I had to re-type in the last post.

About two weeks after the internet provider issue was resolved, I had a problem with the slot in the laptop that I use to read the digital photos from my camera. It totally stopped working. My computer was being “fixed” for a week.

There has been one recent computer success. I just managed to download a conversion file that actually worked as promised. It took a video avi file and split the frames into jpeg or jpg files or digital photos. Very cool because it is the photo I need for the next post.

Thursday, July 30, 2009

Loop in Loop Chain Making Class, Post #8


Classmates are part of the class experience. The classmates I met over the years have ranged from highly competitive to very helpful and friendly. This was a friendly class, but with less interaction than in some classes. I think it is due to the concentration factor of our subject matter which was discussed in post #6.
This is one of the few in-class photos I took and it was not posed. Monique was sitting across from me and she was trying to get a few links done quickly to finish her neckace. She chose to work on her book to get done fast. Usually, we work on a solid color surface. I thought it would make a great photo and quickly asked permission before taking the "action" shot. We immediately got back to work. Monique later gave permission to post the photos here.
The Classical Loop in Loop book starts out with a bit of history about these types of ancient chains, "The loop-in-loop was the predominant chain type used for gold and silver jewelry from the early Bronze Age in Middle East, through the Classical period until the end of the Middle Ages." The Classical Loop in Loop book can be found at Amazon.com. If you have not explored Amazon in a few years, you need to do so. You can literally browse the pages inside of most books, including this book. Just go to this link and "Click to look inside".


Disclosure: This post contains links to an affiliate program, for which I receive a few cents if you make purchases.


Reblog this post [with Zemanta]

Wednesday, July 29, 2009

Loop in Loop Chain Making Class, Post #7

My original intention at the beginning of this blog was to convey the experience of taking a class as an adult. I expected the content of the class to be secondary in importance. As the weeks and writing unfolded, my own interest in the class content naturally increased and it was reflected in the writing. So, my apologies to the reader who was hoping for a step by step explanation or video on how to assemble loop in loop chain. This was not in my original blog plan. However, a video will be in the future plan after the class project is finished because my search of the internet shows a limited amount of available information.

So, I will speak to both the class experience and the content as best as possible. We were in the middle of the short summer semester before realizing it and the weeks were passing quickly. It seems obvious, but it must be stated: it is imperative to keep up with the assignments and not let time slip by. Even if you think you are on top of all the assignments, do a bit more! I swear the time leading up to a deadline accelerates and problems multiply.

This picture shows a loop-in-loop chain being made. There are many types of loop-in-loop chains. The chain pictured is called a one-way double. ‘One-way’ means the links are all added in one direction and ‘double’ means the new addition link goes through two links in the chain. The fabricated components at different stages are shown in the same photo.
1. The round ring of 20 gauge fine or pure silver is fused to itself by heating with a torch.
2. The ring is then stretched with needle-nose pliers to form the oblong shape.
3. Then the center is closed or pinched with pliers and one end is narrowed to allow insertion into the chain.
4. The center large radius bend is slightly initiated.
5. At this stage, the links will need to be annealed before assembly into the chain.
6. The new link is inserted into the openings of the previous two links when making the ‘double’ chain.
7. After insertion into the chain the new link will be bent with a large radius at the center of the loop.
8. The metal probe or scribe tool is used to open up the added link, especially the narrowed end.
9. Periodically, the chain may be annealed to prevent breakage and keep flexibility.


Reblog this post [with Zemanta]

Sunday, July 26, 2009

Loop in Loop Chain Making Class #6 Post

Ancient Chainmaking Loop-in-Loop Class

Tah Dah!
Here are the samples of sailors’ knot or pinched loop chain(left) and single loop-in-loop chain (earrings on right). The class is working on the next set of samples, considering which type of chain to select for their projects, and some are reading ahead in the book. One student ordered her silver wire from out of town and is still waiting.

The silver ring fusing is very sensitive to variables of the flame, the physics of the ring, my personal concentration and torch skills, and of the environment. Flame variables are somewhat controllable. The torch tip needs to be uhmm… perfect. Fortunately, we are in a studio with multiple tips so if one isn’t right we can grab another one. The gas pressure is a factor and it changes as you work. The knob on the torch can be so sensitive that it moves as you work. The charcoal block heats up and this changes the response time of the silver. My vision needs augmentation to see the little opening in the ring that I am attempting to fuse together.

Watching the flame and the opening takes concentration and with other students moving about and moving things while making unexpected noise breaks the concentration. I need to focus on that one ring and nothing else. I found it most interesting that the probability of making a bad fuse is much higher if I am thinking about things that happened at work earlier in the day or things that I need to do after I leave the studio. Concentration is key because these variables make each ring fuse differently and the flame must be removed immediately upon fusing.


Reblog this post [with Zemanta]

Sunday, July 12, 2009

Taking a Class # 5


Taking a Class #5; Second Session

I and one other student arrive just at 6:30 pm for the 2nd class session. It looks like the others have been there for up to one hour and they are now busy at work. I stopped by the craft store looking for a better cutting implement, but without success.
The link stretching, pinching, folding, and weaving demonstration begins right away and I affirm to myself that this is a fun class. We will make the single loop-in-loop chain with the 5/16th inch size rings. This is the simplest to make and is also one that looks very open weave. The fine silver rings are fused, stretched, pinched into a bowtie shape, and folded at the bowtie middle. We now have the shape of a tulip flower that hasn’t bloomed yet. Then with some adept manipulation, one is woven into the next and so on. No photos of the single loop-in-loop chain yet, but if you can't wait then click on the first post of this blog to look at the photo of the Loop-in-Loop Ancient Chain book. It is the only silver chain on the front of the book.
The next chain is ‘pinched loop-in-loop’ or the sailor’s chain and uses the larger 7/16” diameter ring. The same manipulation steps are made up to the bowtie pinch, but then two scribes are needed and needle-nose pliers and well it is just too complicated to describe with words. Pictures and video are needed to communicate the technique.
 At this point, all I have to share are photos of components at various stages and of the finished chain. The photo above is 22 gauge fine silver wound over a 7/16" steel mandrel. This is before the rings are cut. The photo to the immediate left shows the tools used and (counterclockwise) components of cut and fused rings, stretched and pinched bowties, folded and double-pinched step shown in upper right of photo. The photo below shows components at all steps including the finished chain.

Taking a Class # 4

Annealing wire
Taking a Class #4; First Homework
The first assignment doesn’t sound difficult until you consider the quality of your work. The quantity seems very reasonable. Fuse 20 rings of 5/16” diameter and 10 rings of 7/16” diameter. The fusing is the tricky step and the reason I am taking this class. The first rings I cut with scissors and used a 00 torch tip which is the smallest. This took a very long time to heat up to fusing. So, I used a larger, 0 torch tip, on the second batch of rings. This seemed to heat up too fast, so I adjusted the flame. I may have 10 good rings to show for class or one half the required amount. I am not certain if a rough surface in the fuse area is considered good or bad. If rough is bad, then I am way off my target of 20 rings in the 5/16th inch size. I made about 20 rings of the 7/16” size and may have 10 passable rings, but again that depends on the judgement criteria.
The workshop hours available to me were Thursday evening and Saturday afternoon. I still did not have the 22 gauge silver wire by Thursday afternoon. The two supply stores in town had received it, but I would have had to leave work to get it. The wire and the workshop would have to wait until Saturday. I made a phone call to have the wire held for me. Otherwise, it would have been sold out by Saturday. I went out to eat with a friend on Thursday evening and tried to relax. The final class supplies tally for the week was another $40 spend on small tools and silver wire.
We have to anneal the wire before and after it is wound. Annealing softens the metal so it can be worked again. This is done by heating. We are working with very thin, 22 gauge, pure silver wire, so being able to tell when the silver has reached the annealed point is crucial. We usually turn down the lights to see if the glow is retained by the metal when the flame is removed. I can’t share our class with you but I found a video by ArtJewelry magazine showing the annealing of sterling silver sheet. It is a similar process. It is free to register to see the videos. Actually, ArtJewelry magazine has just produced a series of how-to metalworking videos and a blog about how the videos were made. The blog is very interesting and no registration is needed to read it. You can get to the video links from the blog link here:

Wednesday, June 17, 2009

Taking a Class #3


Taking a Class #3
The First Session

The night has finally arrived, June 8, 2009, the first class session. I arrive early only because I thought class started at 6 PM. I was too certain everything was prepared and under control to check the schedule! It was good because I got to ease back into the classroom situation slowly, talk to two instructors I had not seen in 4 or 5 years. I open my double-decker toolbox. I notice that I am not the first arrival. There are two other students, also in class early, and they are introducing themselves to me. Slowly people arrive. We get to fill out the first- night forms and read the hand-out information as we wait for the official starting time. I take a peek at the instructors finished show and tell pieces-- confirmation that this will be a good class. I let the instructor know of the date midway through the course that I will either be very late or miss class due to work related travel.

Class begins as the clock strikes 6:30 PM. The 10 students gather towards the front table where the instructor will talk, show the examples, and demonstrate the steps to make the chains. We will then try to duplicate what she effortlessly demonstrates. It always looks easier than it is. We form our first rings out of 22 gauge fine silver and fuse the openings on a dense charcoal block with an acetylene torch.

The instructor sets the tone of the class in the first session. She says this is a fun class and we should focus on getting our technique polished. We should not stress out about our designs. I have a feeling that we all still looked stressed. She may have expected a collective big “sigh” of relief, but none was heard. A syllabus is presented outlining the topics with goals for each class session. The projects expected from the students during the course are spelled out very clearly during the first session. We are expected to complete a necklace and a bracelet along with 7 samples of different type chains. Some of the materials are very unique and hard to find locally. These must be ordered and time is short in a summer course.

We may take a field trip to a local museum, appropriate because we are studying ancient chain making. We will be working in fine silver. Many examples in the museum are made in gold and are smaller gauge wire and smaller size rings than we will use. I can’t imagine working with gold. I guess you get used to the cost of gold after you work with it. It can always be melted down and re-used.The difference between Loop-in-Loop type chains and chain maille is partly this fusing or closing of the ring. The other difference is the folding or bending of the Loop-in-Loop construction. More on that after the 2nd class session.

Sunday, June 14, 2009

Taking a Class #2


Pre-Class – Gathering Tools


June 1 Anticipation – Isn’t this the best part of preparing for a trip or a class? I rummage through the garage looking for the odd tool left lying on the bench. I have two double-decker, rolling toolboxes and two smaller hand-carry toolboxes. The rolling boxes are the best for going to classes. Everything fits inside and the boxes fit in the back of my vehicle. I sort through the tool boxes, the books, and the magazines and printed instructions. I think I am in good shape for this class because I own a jump ring maker with mandrels for making the jump rings and a cutting bar that utilizes my flex shaft. I spent the prior weekend cleaning and oiling my Foredom flex shaft. This will greatly speed up the production of ring making. The shape of the cut may have an effect on the fusing, so I will not cut many up ahead without experimenting with fusing first.
Memory Lane – I found my materials from a previous one day beginner class in loop-in-loop. It was a fun class and I remember winding the fine silver around mandrels. I love working with fine silver – it does not tarnish! Even when the heat is applied to it. Cutting the fine silver into rings, laying the cut rings onto the charcoal blocks, carefully heating the silver rings with an acetylene torch until the ring fuses closed. Then the rings are elongated and woven to make the chains. Somewhere should be the flush cutters and loop stretching pliers that I bought after my first L-in-L class. The flush cutters will cut wire flat or flush on one side. Most cutters will result in a point or burr cut on both sides.
June 2 Email arrives from instructor with tools and materials list. The email suggests we bring the charcoal block and sharp small scissors to the first class and there is a book. I already own the book and a charcoal block but not the special kind of charcoal block specified.
June 5-6 Competition for supplies has begun. I call the local supply store #1 for the special charcoal block and he has it in stock, but proclaims he does not have the book. But by the next day, local store #1 has sold out of charcoal blocks to my other class mates. Fortunately, local store #2 still has the special charcoal block. This is an expensive charcoal block, so I only buy one… I am supposed to buy two. I may regret this decision. From local store #1, I buy a few small tools that I either don’t have or can’t find. So far, I spent about $36 on small tools and charcoal.
June 7 Anti-theft – I have newly purchased tools and tools from my different tool boxes. Now they need to be identified as belonging to me. All too often, my tools disappear in class or I go off in a rush and leave them behind. The best method is to etch a mark with a vibrating tool. The alternative method is any mark that is difficult to remove. I use fingernail polish, always the same color. I know this could be removed, but it will prevent accidental loss. Indelible markers or label makers are also useful. I will install locks on my large tool boxes this year. I’m also going to use an apron with pockets as an anti-loss prevention method. Making jewelry involves many trips to/from the solder bench from my workstation. I plan to carry my small tools with me in the apron pockets when possible.

Taking a Class

Taking a Class
Making the Commitment
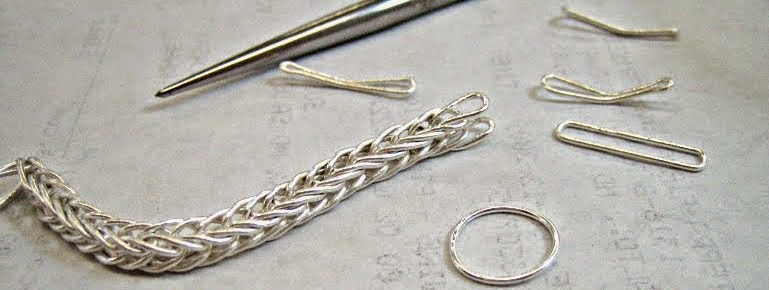
First, let’s be clear that what follows is primarily a discussion based on taking a creative elective class. I am not talking about a required class or a topic requiring you to memorize facts or manipulate numbers. I am talking about an art class where you will create something, be critiqued, and improve your skills. Choosing the class to take is not a trivial decision because not only is it a time and money commitment, but an artistic direction commitment. Usually, I take a class in a topic that has interested me for several years or in a topic I want to take a deeper dive on and refine my skills. This summer I am taking a class in chainmaking, 'Classical Loop-in-Loop Chains', which is an ancient method for making chains.
The instructor will apply his or her own unique flair or approach to the class. I find myself giving an almost equal weighting to the instructor as to the class description at times. In my case, I know the instructor is good because I have taken a class from her before. If you don’t know the instructor or the instructor’s reputation, ask around before registering.
Because I take jewelry classes, the work space is an important consideration. Is it adequate size for the student enrollment? Are the community tools and equipment in good supply and shape? It doesn’t need to be the Hilton, but it does need to be adequate. You don’t want to spend literally half the class waiting to use the one kiln or one whatever.
The class day and time needs to work into my schedule or I need to clear my schedule to make it work. Invariably an overnight work-related trip comes up whenever I sign up for a 10-week class. The open shop hours schedule and how it maps into my own work schedule is also important but this information is not always available until after class gets started.
A few words need to be said about the time commitment. Take special care to make out a daily food plan for the days you will be taking class or going to the workshop. The class will be one or two days per week. But, to get the work done you will need to be in the workshop at EVERY opportunity, which at times may mean every day. Very soon, you forget to go to the grocery store, your family is own their own for meals, and you are eating fast food on the go which gets expensive and is not healthy. Just plan ahead to plan ahead. Your time will become precious, especially as a class deadline approaches, and you will thank yourself later if it is agreed which tasks can slip or be delegated while you are taking this class. The last thing you want to do is lose sleep and eat only unhealthy food.